
CentOS 7系统搭建Rsyslog+LogAnalyzer解决交换机日志收
日志功能对于操作系统是相当重要的,在使用中,无论是系统还是应用等等,出了任何问题,我们首先想到的便是分析日志,查找问题原因。
自 CentOS 7 开始,我们的 CentOS 便开始使用 rsyslog 做为日志收集服务了,相对于之前的 syslog 它能够支持多线程,数据库存储,支持更多了传输协议等等优点。
而 LogAnalyzer 则是一款基于 PHP 开发的 syslog 日志和其他网络事件数据的 Web 前端。它提供了对日志的简单浏览、搜索、基本分析和一些图表报告的功能。
将他们整合起来,我们就能够搭建一个日志收集管理服务器,用来应对小型的日志数据收集分析。
本次主要配置日志服务器用途收集交换机防火墙等网络设备的日志。
配置内容
操作系统:CentOS 7.0 ,最小化安装,配置地址为192.168.119.202
数据库:mariadb v5.5.44
httpd:v2.4.6
php: v2.4.0
LogAnalyzer:v4.1.5
交换机:nutanix_sw1,华为S5720,地址为172.31.205.29
防火墙:gateway,飞塔FG3040b,地址为192.168.1.254
注意,进行服务器的配置之前,务必确保与交换机,防火墙之间的两两路由互相可达,能够ping通。
关闭防火墙和selinux
在CentOS7上面是firewalld
systemctl stop firewalld.service
systemctl disable firewalld.service
systemctl status firewalld.service
关闭 selinux
setenforce 0
getenforce
sed -i 's#SELINUX=enforcing#SELINUX=disabled#g' /etc/sysconfig/selinux
grep SELINUX=disabled /etc/sysconfig/selinux
安装数据库
安装mariadb数据库。
yum -y install mariadb mariadb-server
启动并初始化数据库
启动mariadb数据库服务器
systemctl start mariadb.service
systemctl enable mariadb
初始化数据库
/bin/mysql_secure_installation
NOTE: RUNNING ALL PARTS OF THIS SCRIPT IS RECOMMENDED FOR ALL MySQL
SERVERS IN PRODUCTION USE! PLEASE READ EACH STEP CAREFULLY!
In order to log into MySQL to secure it, we'll need the current
password for the root user. If you've just installed MySQL, and
you haven't set the root password yet, the password will be blank,
so you should just press enter here.
Enter current password for root (enter for none):<–初次运行直接回车
OK, successfully used password, moving on…
Setting the root password ensures that nobody can log into the MySQL
root user without the proper authorisation.
Set root password? [Y/n] <– 是否设置root用户密码,输入y并回车或直接回车
New password: <– 设置root用户的密码
Re-enter new password: <– 再输入一次你设置的密码
Password updated successfully!
Reloading privilege tables..
… Success!
By default, a MySQL installation has an anonymous user, allowing anyone
to log into MySQL without having to have a user account created for
them. This is intended only for testing, and to make the installation
go a bit smoother. You should remove them before moving into a
production environment.
Remove anonymous users? [Y/n] <– 是否删除匿名用户,生产环境建议删除,所以直接回车
… Success!
Normally, root should only be allowed to connect from 'localhost'. This
ensures that someone cannot guess at the root password from the network.
Disallow root login remotely? [Y/n] <–是否禁止root远程登录,根据自己的需求选择y并回车,建议禁止
… Success!
By default, MySQL comes with a database named 'test' that anyone can
access. This is also intended only for testing, and should be removed
before moving into a production environment.
Remove test database and access to it? [Y/n] <– 是否删除test数据库,直接回车
- Dropping test database…
… Success!
- Removing privileges on test database…
… Success!
Reloading the privilege tables will ensure that all changes made so far
will take effect immediately.
Reload privilege tables now? [Y/n] <– 是否重新加载权限表,直接回车
… Success!
Cleaning up…
All done! If you've completed all of the above steps, your MySQL
installation should now be secure.
Thanks for using MySQL!
添加数据库和用户
mysql -uroot -p
创建”rsyslog”的数据库,字符编码设置为utf 8
create database rsyslog character set utf8 collate utf8_bin;
对数据库“rsyslog”创建全权限的rsyslog,的本地用户,设置密码为“rsyslog”
grant all privileges on rsyslog.* to 'rsyslog'@'localhost' identified by 'rsyslog';flush privileges;
安装 rsyslog 的 MySQL 扩展程序包 rsyslog-mysql
安装rsyslog
yum -y install rsyslog-mysql
将 rsyslog 的 MySQL 表导入创建的 rsyslog 数据库,并给予用户权限
将 rsyslog 的 MySQL 表导入创建的 rsyslog 数据库
mysql -uroot -p < /usr/share/doc/rsyslog-8.24.0/mysql-createDB.sql
创建数据库Syslog,设置本地用户rsyslog,密码rsyslog,全部权限
mysql -uroot -p
grant all privileges on Syslog.* to 'rsyslog'@'%' identified by 'rsyslog';flush privileges;
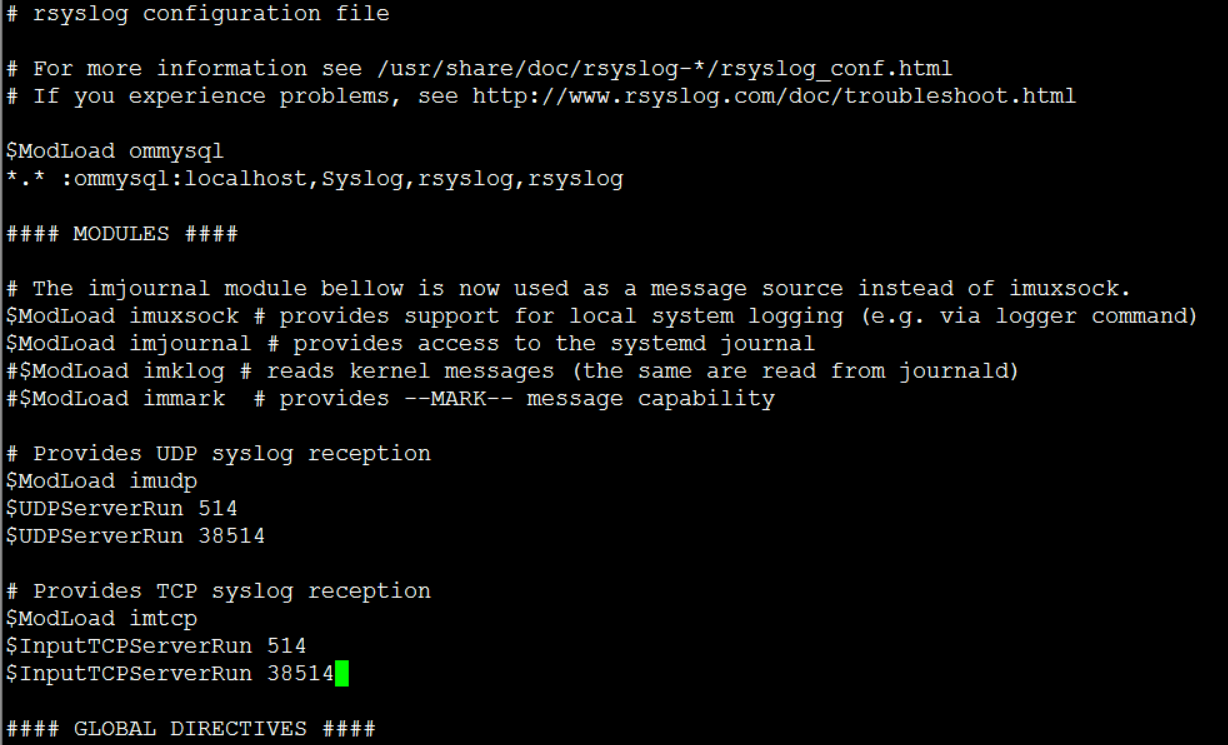
修改 rsyslog 配置文件
vi /etc/rsyslog.conf
$ModLoad ommysql
*.* :ommysql:localhost,Syslog,rsyslog,rsyslog #日志 :ommysql:数据库地址,数据库名,数据库用户,数据库用户密码
# 使用UDP协议传输
$ModLoad imudp
$UDPServerRun 514
$UDPServerRun 38514
#使用TCP协议传输(两者可同时使用)
$ModLoad imtcp
$InputTCPServerRun 514
$InputTCPServerRun 38514 #华为交换机默认发送日志端口
注意,在修改配置文件的时候,要使功能生效,需要将“#”删掉
重启rsyslog服务
systemctl restart rsyslog.service
systemctl enable rsyslog.service
准备web环境
安装所需软件
yum install httpd php php-mysql php-gd -y
下载 loganalyzer
yum install unzip wget -y
cd /var/www/html/
wget https://github.com/rsyslog/loganalyzer/archive/master.zip
解压 loganalyzer
unzip master.zip
复制文件
cp -a loganalyzer-master/src/* /var/www/html/
新建config.php
touch config.php
config.php赋予权限
chmod 666 config.php
启动httpd服务
systemctl start httpd
进入浏览器页面配置
在浏览器中输入192.168.119.202进行配置,提示点击 here 进行配置。

点击之后,提示开始检查。

配置文件检查,注意 config.php 需要 666 权限,如果没有写权限,则会报错提示。

LogAnalyzer 的基本配置,此处配置的数据库为 LogAnalyzer 的数据库,也就是我们自己建的 rsyslog 数据库。数据库名称,用户名及密码都是rsyslog。

如果数据库能正常连接,那么就会显示正常了,如果数据库连接出错,则会提示错误原因,点击 Next 继续下一步。

连接数据库成功后,会自动创建数据库表,提示 24 条成功,0 失败。

提示创建管理员用户
 密码:123456
这一步便是填写日志信息的数据库信息,也就是我们导入 sql 文件所创建的 Syslog 数据库,请注意大小写,监控表为 SystemEvents,默认为小写,会出错,很奇怪。

继续下一步就会提示成功啦,然后点击登录,便能进入查看了。


安装完成后为了安全,请将 config.php 权限修改为 644
[root@localhost html]# chmod 644 config.php
交换机配置
info-center loghost 192.168.119.202//日志服务器地址
info-center enable //启动
-info-center loghost source Vlanif205 //指定日志发送源接口为逻辑口
info-center source default channel 2 log level debugging//发送所有级别的日志
Rsyslog+LogAnalyzer解决IP地址空白或不显示IP地址
mysql -uroot -p
USE Syslog;
ALTER TABLE SystemEvents ADD FromIP VARCHAR(60) DEFAULT NULL AFTER FromHost;

vi /etc/rsyslog.conf
添加
$template insertpl,"insert into SystemEvents (Message, Facility, FromHost, FromIP, Priority, DeviceReportedTime, ReceivedAt, InfoUnitID, SysLogTag) values ('%msg%', %syslogfacility%, '%HOSTNAME%', '%fromhost-ip%', %syslogpriority%, '%timereported:::date-mysql%', '%timegenerated:::date-mysql%', %iut%, '%syslogtag%')",SQL


 注: DBMappings注意大小写,对应后面全部小写,不能有错,对应如下。
uID => id,
Date => devicereportedtime,
Host => fromhost,
Messagetype => infounitid,
Message => message,
Facility => facility,
IP => fromip,
Severity => priority,
Syslogtag => syslogtag,
ProcessID => processid,
Event ID => eventid,
Eventlog Type => eventlogtype,
Event Source => eventsource,
Event Category => eventcategory,
Event User => eventuser,
SystemID => systemid,
Checksum => checksum
修改默认 Table type =>> MonitorWare, 修改为 NewSyslog 也就是上面新添加的NewSyslog。
修改日志选择 Select View => NewSyslog。

facllity:设施,从功能或程序上对日志进行分类,并由专门的工具附则记录其日志
auth:认证相关信息
authpriv:认证授权相关信息
cron:周期性计划任务相关信息
daemon:守护进程相关信息
kern:内核相关信息
lpr:打印相关信息
mail:收发邮件相关信息
mark:防火墙标记
news:新闻相关信息
security:安全相关信息
syslog:自身记录
user:用户相关信息
uucp:早起系统文件共享服务
local0..local7:8个自定义facility
priority:级别
debug:调试信息
info:基本说明信息
notice:需要注意的信息
warn,warning:警告信息
err,error:错误信息
crit:蓝色警报
alert:橙色警报
emerg,panic:红色警报
本文由 帝一博客 原创发布。用户在本站发布的原创内容(包括但不仅限于回答、文章和评论),著作权均归用户本人所有。独家文章转载,请联系邮箱:17762131@qq.com。获得授权后,须注明本文地址: https://bubukou.com/linuxyunwei/1920.html
-
一个小时学会搭建和使用 kubernetes
2021-12-07 17:36
-
linux生成公钥私钥ssh远程实现直接免密登录
2021-05-11 10:31
-
linux(centos)安装lrzsz上传下载软件rz,s...
2021-01-25 17:58
-
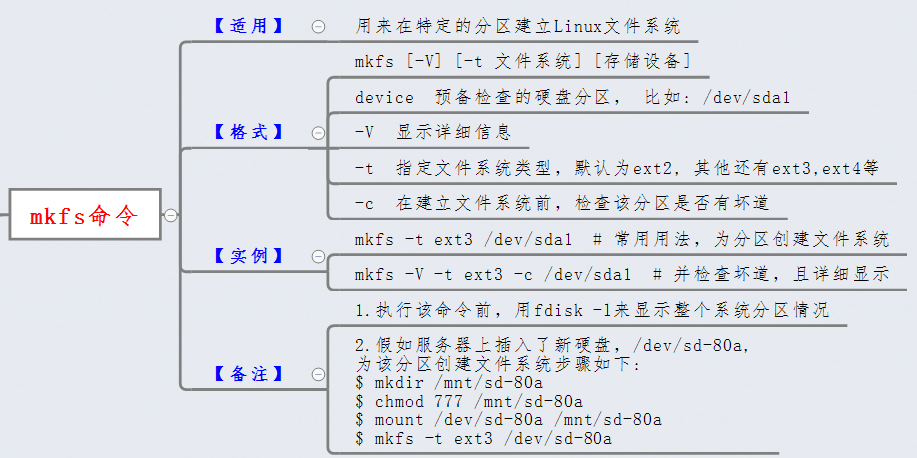
linux mkfs.ext4命令格式化硬盘
2021-01-15 14:54
-
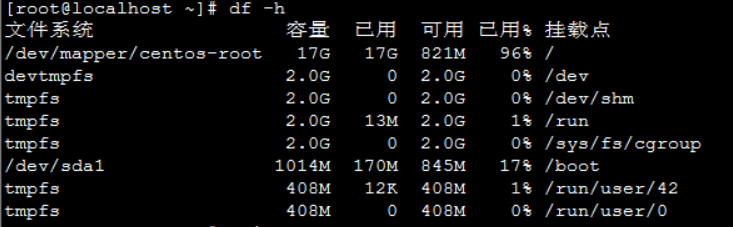
查看linux系统增加根目录空间不足
2020-12-31 11:28
-

linux下如何tightvncserver安装使用图形化访...
2020-12-28 19:03
-
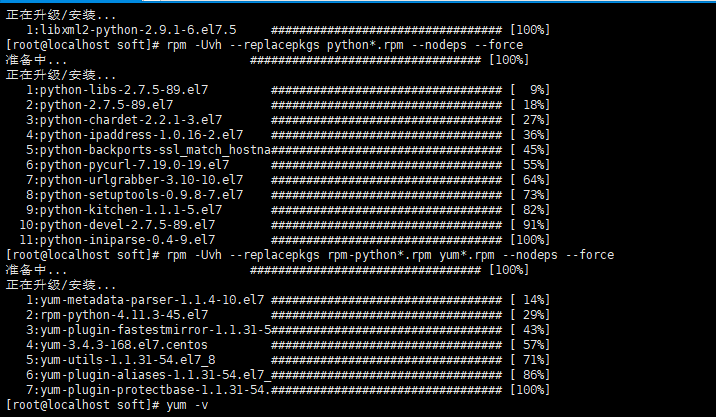
centos7中 yum跟python的安装【附带pytho...
2020-12-08 20:57
-
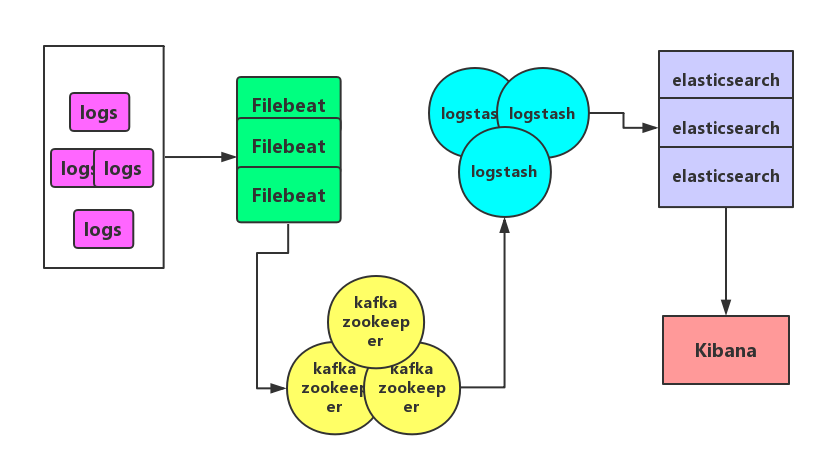
Centos 7.4系统Filebeat + Kafka +...
2020-12-07 10:45
-

CentOS 7系统搭建Rsyslog+LogAnalyze...
2020-12-03 22:12
-
linux groups命令显示指定用户帐户的组群成员身份
2020-11-29 15:52
网友留言评论