
linux usermod命令修改用户属性
usermod命令用于修改用户的基本信息。usermod命令不允许你改变正在线上的使用者帐号名称。当usermod命令用来改变user id,必须确认这名user没在电脑上执行任何程序。你需手动更改使用者的crontab档。也需手动更改使用者的at工作档。采用NIS server须在server上更动相关的NIS设定。
语法
usermod(选项)(参数)
选项
-c<备注>:修改用户帐号的备注文字;
-d<登入目录>:修改用户登入时的目录;
-e<有效期限>:修改帐号的有效期限;
-f<缓冲天数>:修改在密码过期后多少天即关闭该帐号;
-g<群组>:修改用户所属的群组;
-G<群组>;修改用户所属的附加群组;
-l<帐号名称>:修改用户帐号名称;
-L:锁定用户密码,使密码无效;
-s:修改用户登入后所使用的shell;
-u:修改用户ID;
-U:解除密码锁定。
-m:移动主目录的内容到新的位置
-o:允许使用重复的UID
示例:
更改登录目录
usermod -d /home/hnlinux root
改变用户的uid
usermod -u 777 root
修改用户账号登录名字,在中间toml修改名字后面tom是现在用户名
[root@localhost ~]# usermod -l tom1 tom
修改用户备注
[root@localhost ~]# usermod -c jiaoxue tom1
[root@localhost ~]# tail -1 /etc/passwd
tom1:x:500:500:jiaoxue:/home/tom:/bin/bash
锁定账号
[root@localhost ~]# usermod -L tom1
解锁账号
[root@localhost ~]# usermod -U tom1
修改账号的有效期
[root@localhost ~]# usermod -e "2018-12-30" tom1
将tom1添加到组staff
[root@localhost ~]# usermod -G staff tom1
###########################################################################
实例说明:
比如我有hexu 和 www 用户和用户组:
www创建为内部用户禁止远程登陆,用于运行web service。
hexu创建为外部使用用户,用于登陆、调试或是上传代码等。
这时可以考虑hexu添加到www用户组,并将代码目录允许组读写:
usermod -a -G www hexu # 将hexu添加到www用户组
chmod -R ug+w /data/code # 将目录添加用户组可写
###########################################################################
1,新建用户test,密码test,另外添加usertest组
$ useradd test
$ echo "test" | passwd --stdin test
$ groupadd usertest
2,把test用户加入usertest组
$ usermod -aG usertest test ##多个组之间用空格隔开
$ id test
uid=500(test) gid=500(test) groups=500(test),501(usertest)
3,修改test用户的家目录
$ usermod -md /home/usertest
$ ls /home
usertest
4,修改用户名
$ usermod -l testnew(新用户名称) test(原来用户名称)
$ id testnew
uid=500(testnew) gid=500(test) groups=500(test),501(usertest)
5,锁定testnew的密码
$ sed -n '$p' /etc/shadow
testnew:$6$1PwPVBn5$o.MIEYONzURQPvn/YqSp69kt2CIASvXhOnjv/t
Z5m4NN6bJyLjCG7S6vmji/PFDfbyITdm1WmtV45CfHV5vux/:15594:0:99999:7:::
$ usermod -L testnew
$ sed -n '$p' /etc/shadow
testnew:!$6$1PwPVBn5$o.MIEYONzURQPvn/YqSp69kt2CIASvXhOnjv/t
Z5m4NN6bJyLjCG7S6vmji/PFDfbyITdm1WmtV45CfHV5vux/:15594:0:99999:7:::
6,解锁testnew的密码
$ usermod -U testnew
$ sed -n '$p' /etc/shadow
testnew:$6$1PwPVBn5$o.MIEYONzURQPvn/YqSp69kt2CIASvXhOnjv/t
Z5m4NN6bJyLjCG7S6vmji/PFDfbyITdm1WmtV45CfHV5vux/:15594:0:99999:7:::
7,修改用户的shell
$ sed '$!d' /etc/passwd
testnew:x:500:500::/home/usertest:/bin/bash
$ usermod -s /bin/sh testnew
$ sed -n '$p' /etc/passwd
testnew:x:500:500::/home/usertest:/bin/sh
# 也可以手动编辑 vi /etc/passwd 找到testnew编辑保存即可
$ vi /etc/password
8,修改用户的UID
$ usermod -u 578 testnew (UID必须唯一)
$ id testnew
uid=578(testnew) gid=500(test) groups=500(test),501(usertest)
9,修改用户的GID
$ groupadd -g 578 test1
$ usermod -g 578 testnew (578组一定要存在)
$ id testnew
uid=578(testnew) gid=578(test1) groups=578(test1),501(usertest)
10,指定帐号过期日期
$ sed -n '$p' /etc/shadow
testnew:$6$1PwPVBn5$o.MIEYONzURQPvn/YqSp69kt2CIASvXhOnjv/t
Z5m4NN6bJyLjCG7S6vmji/PFDfbyITdm1WmtV45CfHV5vux/:15594:0:99999:7:::
$ usermod -e 2012-09-11 testnew
$ sed -n '$p' /etc/shadow
testnew:$6$1PwPVBn5$o.MIEYONzURQPvn/YqSp69kt2CIASvXhOnjv/t
Z5m4NN6bJyLjCG7S6vmji/PFDfbyITdm1WmtV45CfHV5vux/:15594:0:99999:7::15594:
11,指定用户帐号密码过期多少天后,禁用该帐号
$ usermod -f 0 testnew
$ sed -n '$p' /etc/shadow
testnew:$6$1PwPVBn5$o.MIEYONzURQPvn/YqSp69kt2CIASvXhOnjv/t
Z5m4NN6bJyLjCG7S6vmji/PFDfbyITdm1WmtV45CfHV5vux/:15594:0:99999:7:0:15594:
本文由 帝一博客 原创发布。用户在本站发布的原创内容(包括但不仅限于回答、文章和评论),著作权均归用户本人所有。独家文章转载,请联系邮箱:17762131@qq.com。获得授权后,须注明本文地址: https://bubukou.com/linuxyunwei/1965.html
-
一个小时学会搭建和使用 kubernetes
2021-12-07 17:36
-
linux生成公钥私钥ssh远程实现直接免密登录
2021-05-11 10:31
-
linux(centos)安装lrzsz上传下载软件rz,s...
2021-01-25 17:58
-
linux mkfs.ext4命令格式化硬盘
2021-01-15 14:54
-
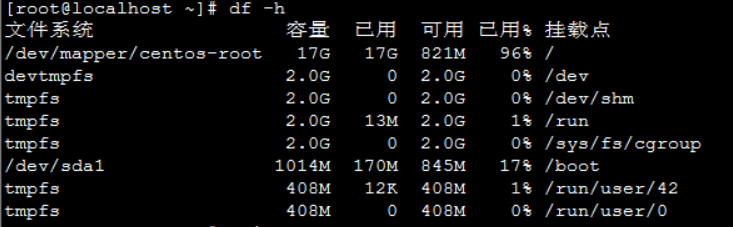
查看linux系统增加根目录空间不足
2020-12-31 11:28
-

linux下如何tightvncserver安装使用图形化访...
2020-12-28 19:03
-
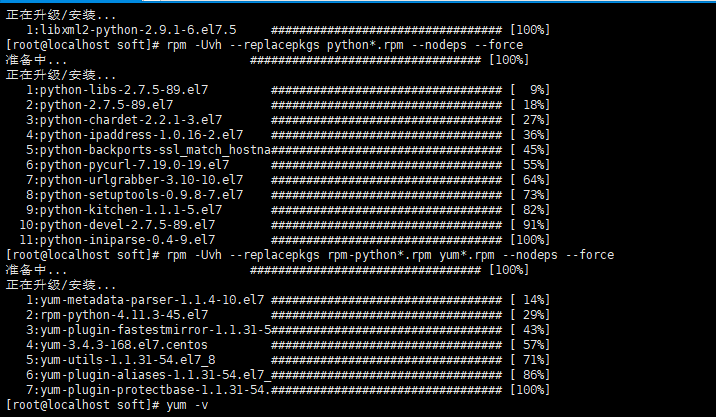
centos7中 yum跟python的安装【附带pytho...
2020-12-08 20:57
-
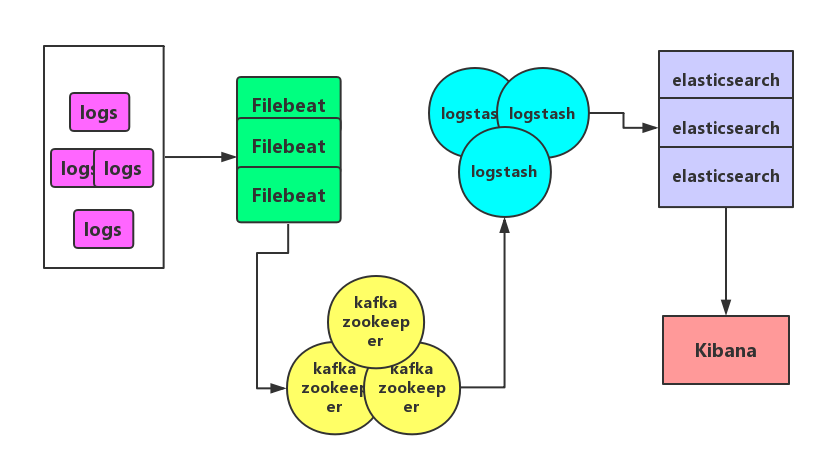
Centos 7.4系统Filebeat + Kafka +...
2020-12-07 10:45
-
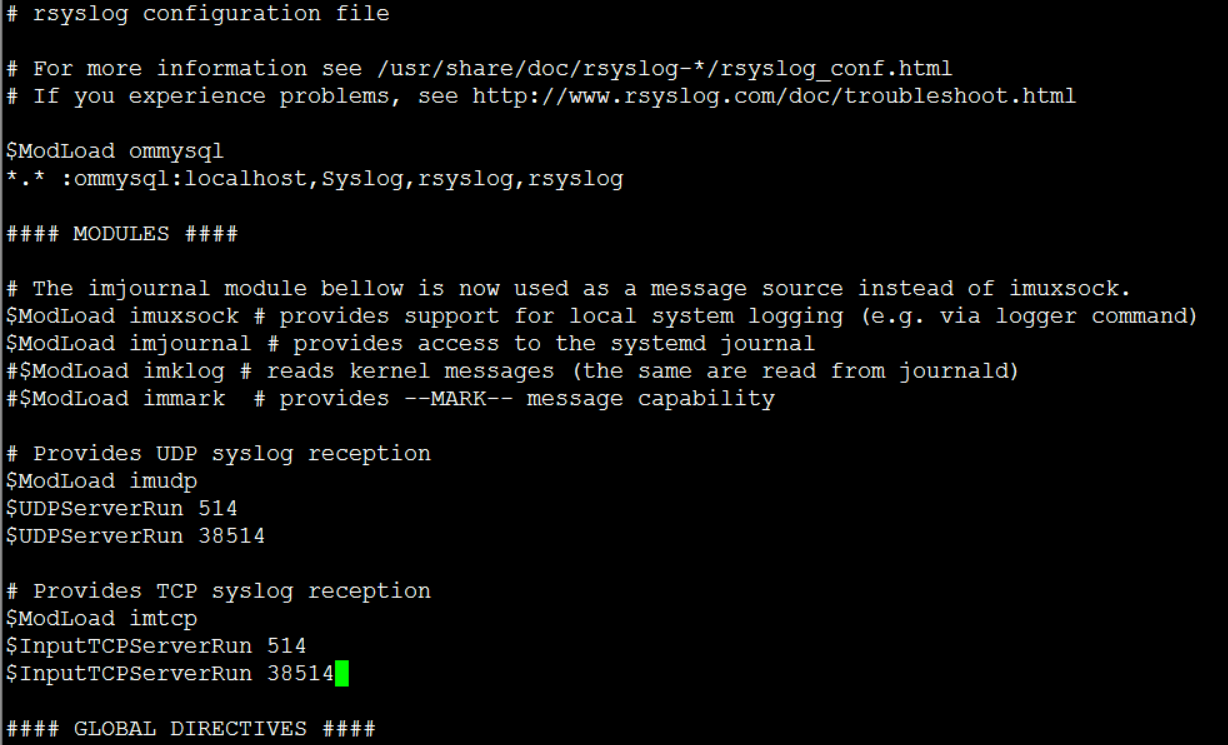
CentOS 7系统搭建Rsyslog+LogAnalyze...
2020-12-03 22:12
-
linux groups命令显示指定用户帐户的组群成员身份
2020-11-29 15:52
网友留言评论